msmcknittington (![[personal profile]](https://www.dreamwidth.org/img/silk/identity/user.png) msmcknittington) wrote2007-05-09 12:08 am
msmcknittington) wrote2007-05-09 12:08 am
Entry tags:
Tudor gown; knitting FO
1. I finished another beret, this time for my friend Tabatha. It's once again in Elann Peruvian Highland Wool, and I still love it. I washed it in shampoo and rinsed it with conditioner, so it turned out very soft indeed. I also did one more set of decreases to the brim on this one, so it's a little bit perkier than the other one.

I also got my hair cut again, and it's quite a bit (3-4 inches) shorter. There are days when I wonder what the hell I was thinking, and then there are days when it's really cute. Unfortunately, there aren't many of the latter.
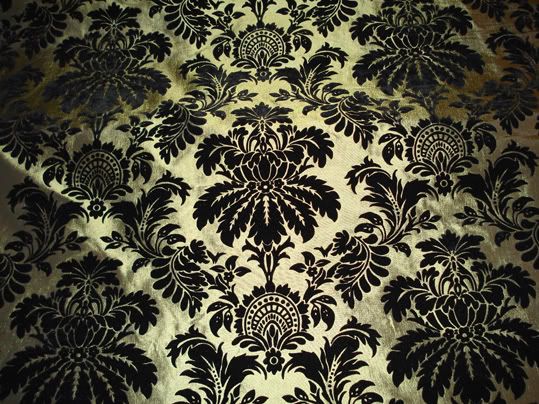
2. I found a site with samples of period brocade that are incredibly similar to this stuff from my fabric acquisition post. That makes me so happy! Even if the stuff I have is flocked acetate.
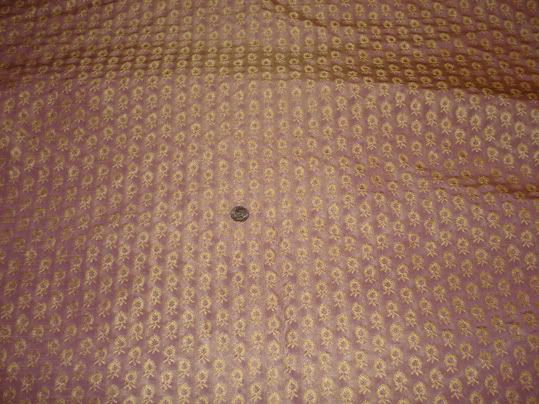
3. I started a Tudor kirtle, using some of the fabric I acquired in my last post. I went with the pretty, pretty purple stuff, which I've discovered is wholly synthetic and melts in delightful crusty bits when ironed no matter how much steam. It looks surprisingly period, though. It's definitely period-oid, and it good enough for ren faire. I also think I can stretch this puppy to cover most of the sixteenth century, from about the late 1530s to 1570 with the appropriate accessories.
I'm using the Tudor Ladies' Gown and Kirtle pattern from Reconstructing History. I was delighted to realize that by adjusting the back neckline and depth of the front point, I can use this to make kirtles for the entirety of the sixteenth century.
My justification behind making this before my sister's kirtle is a) I don't have the fabric for hers yet, and b) I can mess up on mine and not feel as horrible as I would if I botched hers.
So, onto the pictures.


Front, side, back
My apologies for the toothpaste on the mirror. This was before I remembered I had a timer on my camera and that the second shelf in the medicine cabinet was the perfect perch for torso shots.
I made the mock-up out of one layer of upholstery canvas and some heavyweight sew-in interfacing I had lying around. It was boned with a combination of cable ties and spring steel boning. Other than the back being about an inch too long, it fit perfectly. Color me amazed! That never happens. I know it looks like the top is too higher, but with the edge finished, it's the proper height. The bust curve stitchline has also settled nicely with the straps sewed on instead of pinned.
I liked the way the heavyweight interfacing behaved so much that I used it as an interlining between the fashion layer and the boned lining for the actual product. It helps stop the boning from showing through fashion fabric, which is fairly thin.
I also really like the thought of a bright red brocade kirtle. I may be unstoppable. The end of summer may see me with a RED brocade kirtle.
The mock-up was completely painless. So I moved right along to the actual thing.


Front (smooshface cropped out), side (lazily laced), side (fully laced), back
The bodice is constructed basically ignoring the directions that came with the pattern, which was for a back lacing kirtle. That proceeded thusly:
I extended the bodice point by one inch to accomodate the length of my steel boning, which was just a little bit too long to work with the length as given. For the back, which was too long, instead of cutting the length off, I left it on the pattern and turned the back up so I didn't have to bind it. I also cut the back without a back seam, by cutting the center back on the fold without seam allowance. I also extended the straps by an half-inch.
The lining is two layers of cotton duck, boned according to the pattern. I constructed it like a corset, basting the edges of the layers together and then sewing the boning casings by machine. I re-used the boing for the mock-up, since it was already cut to the right length. It was salvaged from an old corset and from my Venetian when I replaced some of the cable ties with steel. There is a half-inch steel bone at the center front, and two quarter-inch steel bones at the center back.
For the top layer, I cut out the heavyweight interfacing using the boned section as the pattern, and then laid the interfacing on the fashion fabric and cut that out. I then pinned the pieces together and basted them a scant quarter-inch from all edges. Then I pinned that to the boned lining and basted it together a quarter-inch from the edge. Then I sewed the straps to the front.
All edges except the bottom are finished with piped bias binding, which I made using the fashion fabric and some Peaches & Cream cotton yarn, worsted weight. (The armhole and lacing aren't bound yet in these pictures. I still need to trim those seam allowances and baste it down.) The bias piping is held down with a large running stitch. There are so many layers here that a finer stitch would have been lost, I think.
You can see on the photo of the back that I need to tuck the ends of the bias binding down at the center back and tack them down. I'm holding off on that until everything else is finished, though.
I did, however, run into some trouble with the piped bias on the neckline and a mystery wrinkle at the bust.

This corner of the neckline is totally ugly. I should have done the entire neckline by hand, rather than just the boned section that wouldn't fit through. I'm blaming this on the fact that cable ties and steel don't fit through a sewing machine well. Yeah, that's it. Not my sewing skills at all. I think I can save it with some judicious handsewing, though.


Wrinkle close-up, made blatant by arrow
As for the mystery wrinkle, it has me confused. The mock-up didn't have a wrinkle there. It was, in fact quite smooth. It goes boning, boning, BOOBS! So why does this much sturdier version of the bodice have a rather conspicious wrinkle? Has anybody found a solution to this issue?
Now comes the debate over trimming this puppy. I'm not sure if I should or not. On the one hand, if I do, then I can stretch its use: All I'd need to do is make a partlet and some sleeves, and I could wear it as a 1550/60s style dress. So, friends, this is where you come in.
If I trim this bodice, it will be using some burgundy velvet, which is nearly impossible to get a color correct photo of. It looks like dark, dark wine under artificial light, but in the sign it's a sort of plummy red. It eventually will be turned into a solid-fronted Venetian, like this portrait of Titian's daughter, but I'll have enough left over to trim this bodice out.

Plain

After Eleanora di Toledo's burial gown

Version 3

Version 4
Which would you go with? I'm leaning right now towards the Eleanora di Toledo version or Version 3. They seem the most flexible, and the Eleanora has the advantage of being from the 1550s, while there are examples from the 1540s, as well. The look is a generic mid-century thing. The only problem is that the back neckline on my bodice is, well, wrong. Oh, and that this trimming look is Italian. I think I can live with that, though.
I am currently very startled by how easily this is going together. I'm predicting that this means I will sew the skirt together inside out more than once or spill red Kool-Aid all over the entire ensemble at some time in the future. Costuming is not supposed to be this easy!
What I have left to do:
--Baste down piped bias along armholes/lacing
--Skirts
--Figure out trimming situation
--Maybe insert an lining
--Sleeves? Sleeve cap?
--Finish covering lacing holes
I also got my hair cut again, and it's quite a bit (3-4 inches) shorter. There are days when I wonder what the hell I was thinking, and then there are days when it's really cute. Unfortunately, there aren't many of the latter.
2. I found a site with samples of period brocade that are incredibly similar to this stuff from my fabric acquisition post. That makes me so happy! Even if the stuff I have is flocked acetate.
3. I started a Tudor kirtle, using some of the fabric I acquired in my last post. I went with the pretty, pretty purple stuff, which I've discovered is wholly synthetic and melts in delightful crusty bits when ironed no matter how much steam. It looks surprisingly period, though. It's definitely period-oid, and it good enough for ren faire. I also think I can stretch this puppy to cover most of the sixteenth century, from about the late 1530s to 1570 with the appropriate accessories.
I'm using the Tudor Ladies' Gown and Kirtle pattern from Reconstructing History. I was delighted to realize that by adjusting the back neckline and depth of the front point, I can use this to make kirtles for the entirety of the sixteenth century.
My justification behind making this before my sister's kirtle is a) I don't have the fabric for hers yet, and b) I can mess up on mine and not feel as horrible as I would if I botched hers.
So, onto the pictures.
Front, side, back
My apologies for the toothpaste on the mirror. This was before I remembered I had a timer on my camera and that the second shelf in the medicine cabinet was the perfect perch for torso shots.
I made the mock-up out of one layer of upholstery canvas and some heavyweight sew-in interfacing I had lying around. It was boned with a combination of cable ties and spring steel boning. Other than the back being about an inch too long, it fit perfectly. Color me amazed! That never happens. I know it looks like the top is too higher, but with the edge finished, it's the proper height. The bust curve stitchline has also settled nicely with the straps sewed on instead of pinned.
I liked the way the heavyweight interfacing behaved so much that I used it as an interlining between the fashion layer and the boned lining for the actual product. It helps stop the boning from showing through fashion fabric, which is fairly thin.
I also really like the thought of a bright red brocade kirtle. I may be unstoppable. The end of summer may see me with a RED brocade kirtle.
The mock-up was completely painless. So I moved right along to the actual thing.
Front (smooshface cropped out), side (lazily laced), side (fully laced), back
The bodice is constructed basically ignoring the directions that came with the pattern, which was for a back lacing kirtle. That proceeded thusly:
I extended the bodice point by one inch to accomodate the length of my steel boning, which was just a little bit too long to work with the length as given. For the back, which was too long, instead of cutting the length off, I left it on the pattern and turned the back up so I didn't have to bind it. I also cut the back without a back seam, by cutting the center back on the fold without seam allowance. I also extended the straps by an half-inch.
The lining is two layers of cotton duck, boned according to the pattern. I constructed it like a corset, basting the edges of the layers together and then sewing the boning casings by machine. I re-used the boing for the mock-up, since it was already cut to the right length. It was salvaged from an old corset and from my Venetian when I replaced some of the cable ties with steel. There is a half-inch steel bone at the center front, and two quarter-inch steel bones at the center back.
For the top layer, I cut out the heavyweight interfacing using the boned section as the pattern, and then laid the interfacing on the fashion fabric and cut that out. I then pinned the pieces together and basted them a scant quarter-inch from all edges. Then I pinned that to the boned lining and basted it together a quarter-inch from the edge. Then I sewed the straps to the front.
All edges except the bottom are finished with piped bias binding, which I made using the fashion fabric and some Peaches & Cream cotton yarn, worsted weight. (The armhole and lacing aren't bound yet in these pictures. I still need to trim those seam allowances and baste it down.) The bias piping is held down with a large running stitch. There are so many layers here that a finer stitch would have been lost, I think.
You can see on the photo of the back that I need to tuck the ends of the bias binding down at the center back and tack them down. I'm holding off on that until everything else is finished, though.
I did, however, run into some trouble with the piped bias on the neckline and a mystery wrinkle at the bust.
This corner of the neckline is totally ugly. I should have done the entire neckline by hand, rather than just the boned section that wouldn't fit through. I'm blaming this on the fact that cable ties and steel don't fit through a sewing machine well. Yeah, that's it. Not my sewing skills at all. I think I can save it with some judicious handsewing, though.
Wrinkle close-up, made blatant by arrow
As for the mystery wrinkle, it has me confused. The mock-up didn't have a wrinkle there. It was, in fact quite smooth. It goes boning, boning, BOOBS! So why does this much sturdier version of the bodice have a rather conspicious wrinkle? Has anybody found a solution to this issue?
Now comes the debate over trimming this puppy. I'm not sure if I should or not. On the one hand, if I do, then I can stretch its use: All I'd need to do is make a partlet and some sleeves, and I could wear it as a 1550/60s style dress. So, friends, this is where you come in.
If I trim this bodice, it will be using some burgundy velvet, which is nearly impossible to get a color correct photo of. It looks like dark, dark wine under artificial light, but in the sign it's a sort of plummy red. It eventually will be turned into a solid-fronted Venetian, like this portrait of Titian's daughter, but I'll have enough left over to trim this bodice out.
Plain
After Eleanora di Toledo's burial gown
Version 3
Version 4
Which would you go with? I'm leaning right now towards the Eleanora di Toledo version or Version 3. They seem the most flexible, and the Eleanora has the advantage of being from the 1550s, while there are examples from the 1540s, as well. The look is a generic mid-century thing. The only problem is that the back neckline on my bodice is, well, wrong. Oh, and that this trimming look is Italian. I think I can live with that, though.
I am currently very startled by how easily this is going together. I'm predicting that this means I will sew the skirt together inside out more than once or spill red Kool-Aid all over the entire ensemble at some time in the future. Costuming is not supposed to be this easy!
What I have left to do:
--Baste down piped bias along armholes/lacing
--Skirts
--Figure out trimming situation
--Maybe insert an lining
--Sleeves? Sleeve cap?
--Finish covering lacing holes